Showing posts with label flora. Show all posts

Sunday, August 23, 2015

Bracketing Those Shots

Round Bales in the Field
Lately, I have changed my photography process. It started when I discovered that Magic Lantern was available for my Canon 60D. For those wondering what that is, think of a firmware add-on which extends the capabilities of your camera. Near and dear to my heart, it is open source software that the camera reads from the memory card as it starts up, so no concerns about "bricking" my camera ! More importantly, it has added a host of options that I am really starting to enjoy using.
The default Canon firmware has a setting called "Auto Bracket", which allows the photographer to set up a three-shot bracket around the optimal exposure, and the photographer then sets the number of EV (in 1/3 stop increments) between captures. With Magic Lantern, the photographer has a lot more control - either choosing how many shots in the bracket manually, or letting the software determine what it needs in-camera.
On the back end, Lightroom CC has the ability to take the bracketed shots and merge them into one, creating an HDR-style photograph without all of the weird side-effects. There is also a nifty function called "anti-ghosting" which will attempt to eliminate any elements that occur in one of the frames but not all of them - like a truck or bird passing through the frame !

So all the way through, my choices have encouraged me to create bracketed photos, which bring out an added feeling of depth and warmth. These various functions, when properly mixed, have made complex techniques very straight-forward, allowing me to concentrate on the composition more. And that I where I know I need to focus more of my attention !

Sunday, August 9, 2015

The Golden Hour

Pat bought some simple sunflowers for the table yesterday. As I was getting out of bed, and fumbling for my first coffee, I couldn't help but notice how beautifully the morning sun was coming in through the dining room window. So, after a quick caffeine break, I grabbed my camera.

The scene could be set in so many ways - I could've arranged the flowers & draped a sheet or towel to create a neutral background, so the flowers were the focal point. But I decided to do what I could in-camera. No tricks, just pure photography.

This is the first image I took. It is dark in all the wrong places, and it almost looks like the vase full of stems was the focal point. But this is how it looked when I noticed the warm vibrancy of the sunlight. And look at the shadows on the apples - I really love the sense of depth.


This is the same image, gently re-touched. I'm not a huge fan of overdoing post-processing. I believe that the best photos happen in the first 2" behind the camera - the photographer's eye.

The image I captured has been cropped to 16X9, because I love the feel of that aspect ratio. I brought the exposure up about 2/3 of a stop, and played a little with the blacks & whites.

Some may feel that the vase now looks blown out, and that is OK. I like how it looks. The apples still have a nice sense of depth, but more of their colours are showing.

I could have messed with the saturation of colours in the flowers & stems. I could have, but I didn't. They have wonderful tonality (really... I did just say that !) that also gives them depth.

Rule of thirds, golden ratio, bah ! A nice, simple capture of something that caught my eye first thing in the morning.

It truly was the "golden hour".


Saturday, April 5, 2014

Project365 - Black Backdrop

Introduction
Today I learned much more about a technique I had attempted once before. Now that I better understood how it worked, I believe I am better able to put it to good use. You see, one of the things that most studio photographers invest in is backdrops. Often large rolls of seamless white or black paper, they allow the subject to be the true focus of the photograph. Who knew I was carrying a black backdrop around in my camera ?!?

It's truly a simple effect involving the use of flash (or sometimes called strobe) photography. Cameras have a maximum speed with which they can sync with the flash to achieve a nicely lit picture, it's usually around 1/250th of a second. Keeping that portion of the exposure triangle still, we next dial down the ISO (the sensitivity of the CCD) to 100. The only thing left that is adjustable is the aperture. All we do is close that down until a picture taken in the ambient light is completely black. Now, anything lit up by the flash will be nicely lit, while the background remains black.

The Setup

Nothing really complicated the Canon 60D, set at f/16, ISO 100, and a shutter speed of 1/250th of a second. The Cactus v5 was mounted in the hotshoe, so I could use the Canon 430EX II off-camera. I placed it on a basic tripod with the other Cactus v5, so I could move the light & the camera around freely.

The Photos

Believe it or not, this is a photo of Pat's flowers on the dining room table. I was setting the ISO, Aperture and shutter speed to get a black background. Got it !


Whoops ! The flash was spilling onto the background too much, so I elected to put a snoot on the flash, to more tightly focus the beam.


That's better ! Although you will notice the pen & paper on the tabletop still show up faintly. Now to play around a bit... ;-)


The first few pictures weren't as bright as I would have liked, so they came out a little dull. Time to up the power of the flash a notch, and move the light stand a little closer !


Much better ! I like the contrast created by the various petals on the flowers.


I think this is one of my favorite photographs of the shoot...


Lessons Learned

I thought I really understood this technique, but now with a little better tutorial, I think I know how to nail it whenever I need it. Certainly, implementing the snoot helped narrow the beam, and moving the light stand over to one side helped with not lighting the background. I really like this technique & see myself using it for portrait work.


Saturday, March 8, 2014

Project365 - Just Because...

Introduction
Every once in a while, I like to take photographs "just because". I don't always need to be experimenting with my gear, or trying to learn some kind of new technique. I love to photograph flowers - sue me ! I decided to change things up a bit this morning. Our dining room window had some beautiful light, and Pat's about-to-be-replaced bouquet of flowers were lapping up just that last little bit of sunshine. Most of the blooms were dead or dying, but this one orchid was hanging on for dear life !

The Setup
As always, I shot with my Canon 60D. To change things up a little, I mounted my Canon 17-40mm f/4 L wide-angle zoom lens. I shot handheld, as I like to get in nice and tight. At first, I was using a 12mm extension tube, but didn't get the results I had hoped for, so they were discarded pretty much as soon as I saw them ! Only the first photo below survived.

The Photos


Lessons Learned
None - I like lilies. Sometimes you just need to shoot for the joy of it. =D


Saturday, March 1, 2014

Project365 - Up Close and Personal !

Introduction
It's eleventy-beelion degrees below zero this weekend, so my photo shoots are being limited to in-studio for a couple of days. This means a lot more technical shoot, using more of my equipment. I have no willing subjects - teenagers sleep a remarkable amount, and the critters tend to get bored & wander away - so I'm shooting flowers. Yep, flowers - they don't give attitude, they don't wander off, and most importantly they are pretty to look at !

The Setup

I shoot with a Canon 60D, and today opted to shoot with my Canon 40mm f/2.8. It has a nice wide aperture, allowing lots of light onto the sensor. I mated it with a 12mm extension tube, to allow me to get a little closer. The whole rig was mounted on a Manfrotto tripod, and I chose to go off-camera with my Canon 430EX II flash using a pair of Cactus v5 triggers.

Here's what the shot started off as. Later I chose to add the external light to accentuate the blooms.


The Photos

Whoops ! I totally blew out the photo by setting the flash at full power with a wide (28mm) beam. Let's try that again ! (Neat effect, though)


Better, but I still have too much light at 1/8 power. It blows out the left side, while creating a strange white rim on the right side. Once more...


I dialled down the power to 1/32, but the flash is showing up in the corner. I didn't see it when I shot it, but it is definitely there !


This is much better. The flash is low-power, and behind the bloom. It makes the flower positively glow ! I tried to balance the aperture so that the leaves in the background were blurry, while most of the bloom (the stamen is the focal point) is in-focus.


Lessons Learned

I am learning more about studio setup. Using my tripod, flash, triggers and shutter release to create visually interesting images is actually a lot of fun ! I wonder if Pat would let me convert one of the kids rooms into a studio ?!? =D


Sunday, February 23, 2014

Project365 - More Colour, Please !

Introduction
In my previous post, I was shooting Pat's tulips utilizing the abundant natural light from our bay windows, and augmenting the photos with some fill lighting - namely my off-camera flash. While the photos were technically accurate, and turned out nicely, Pat suggested they showed too much green, and not enough of the tulips's colour. So here is take two...

The Setup

I decided that I wanted to get closer, so that the blooms filled the frame. Similar to macro photography, I wanted to capture as much of the colour of the blooms as possible. So I outfitted my Canon 60D with my Canon 40mm f/2.8 Prime lens, and augmented it with 12mm extension tube. I shot handheld, so I could move around the vase at will, and used the ambient light as my only source. I started with the aperture wide open, and the ISO at 500, to create a very blurry background, and still allow me to dial up the shutter speed so as to eliminate camera shake.

The Photos

I love the way the open aperture creates a nice, blurry background, so the eye focuses on the bloom. I even managed a little bokeh in the background !


The soft lighting from the windows makes the delicate pink blooms appear to glow.


This photo underscores the issue of having the aperture setting too wide open. The depth of field is so narrow that the petals appear to be soft & blurry as well. Probably should have opened up a little to say f4 or f5.6


Lessons Learned

There IS such a thing as too narrow a depth of field. It made the shots a little fuzzier than I wanted. While I achieved my goal of creating much more colourful photos of the tulips for Pat, I am not overly pleased with the output. But that's why this project exists - to build experience and practice my craft !


Project365 - Easing Back Into It...

Introduction
OK, OK... I know it's been too long. My eye infection really bothered me for about a week & was really affecting my vision. But enough is enough ! Time to get back on track. So without further ado...

Pat really loves tulips. Since we are able to get cut tulips relatively I expensively, we have agreed that they make a nice addition to our table. And since it's too darn cold outside to shoot, it's time to practice some strobism. You know, using my flash to provide extra lighting ?

The Setup

The table has excellent lighting, owing to the bay windows. It's a bright sunny day out, and we often have to close the blinds partway to keep from getting overwhelmed by the sunlight ! I know, nice problem to have... So this shoot has the vase about two feet in front of the partially-closed blinds. From there, I set up my Canon 60D on a Manfrotto tripod, with the trusty 25-105mm f/4 L lens. I also used the Cacyus v5 transmitters to take the Canon 430EX flash off the body. I wanted to experiment with different lighting strengths & positions.

The Photos

I took about 25 photos. They have the flash in various positions, and in varying strengths. Like the camera, I operate my flash in fully manual mode as well.

This first image was the test-shot. I set my aperture, ISO & shutter speed to create a "perfect exposure. As you can see, the lighting from the window is beautifully exposed, but the flowers & vase are dark. We need a "fill" light.


The second image has too much flash ! Set at 1/8 power, the flash is overwhelming the shot, creating harsh shadows in the leaves.


In the third shot, I have dialled back the flash to 1/16th, which is better, but still a little strong for my tastes.


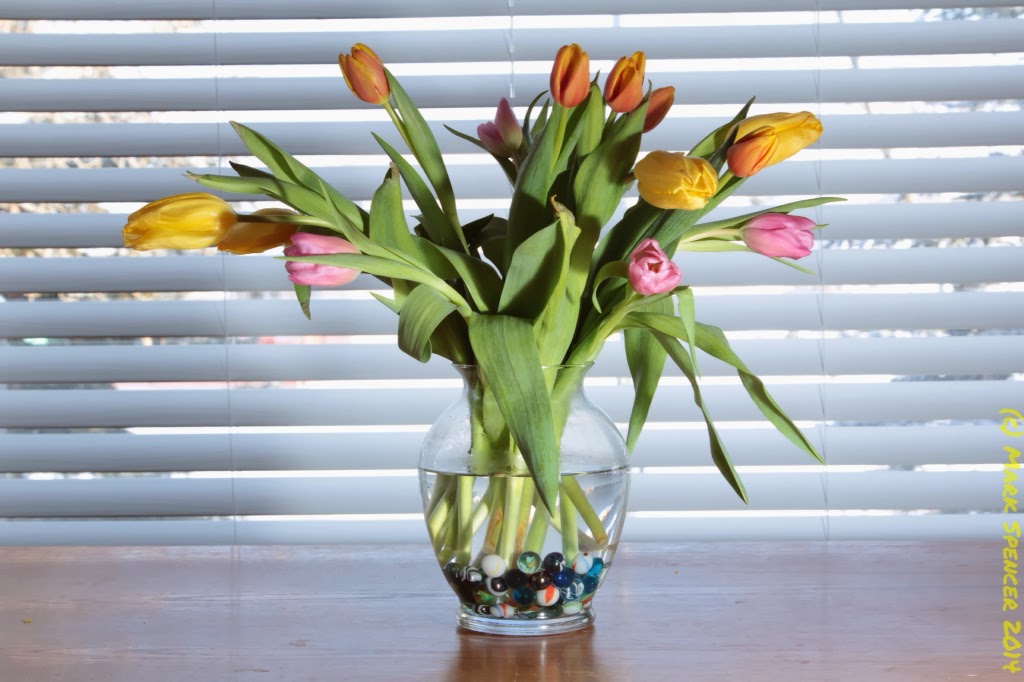
This fourth shot has the powers knocked back to 1/32 strength, but I also moved the placement of the flash. The colours are still nice & bright, without overwhelming the scene.


In this final shot, I moved the flash further away, dialled it back up to 1/16 power, and have it at almost 90 degrees (on the left side) of the flowers. I think the lighting is OK, but not nearly as dramatic as the fourth shot.


Lessons Learned

I have a lot to learn about studio shooting. And this was shot with only two light sources - the ambient light from the windows and a fill flash. In the future, I'd like to pick up another flash to do multi-plane lighting. I also kept the setup really simple - no reflectors or other mods. About the only mod used was a diffuser on my flash to soften the fill lighting, which I included after the second shot.


Saturday, February 8, 2014

Project365 - Experiments in Shutter Speed

Introduction
Pat & I are in Las Vegas this week, escaping the icy cold of winter in Calgary. It's a beautiful place, and I am taking literally hundreds of pictures. So I thought I'd take a minute and share a fun little technique I learned, which illustrates how your shutter speed affects your overall photograph.
The Setup
Today, nothing fancy. My canon 60D, handheld, with my general-purpose 24-105mm f/4 L series lens. Enough gear to be good for walking around, doing a little "street photography".
The Photos
This first photo has the shutter speed around 1/125th of a second. The water appears to be frozen in time. Chunky & droppy...


Here in this second image, the shutter is left open for just a little longer, at 1/8 of a second. See how silky & smooth the flowing water looks ?


Lessons Learned
Admittedly, in order to change the shutter speed to change the "feel" of the photos, I also had to manipulate the Aperture. These two combined, along with ISO, create the "golden triangle" of perfect exposures. By slowing down the shutter, more water flows past, making the water look silken. Speed it up, and the water looks choppy.

Monday, December 30, 2013

Project365 - Ice Fog

Tonight, as I drove home from the hockey game (Calgary Hitmen beat the Kootenay Ice 4-2 ! ), we noticed how thick the ice fog was getting. As we got closer to home, we saw how the fog was causing ice crystals on the trees. Here are some photos I took of one of the trees.


The amber lighting of the street lamps makes this series look like the old sepia-tinted black & white photos from the turn of the century.


Each branch is finely lit by the overhead streetlight, accenting the shapes of the individual branches.


This is my favourite from the evening.


My friend Maggie has asked me how I will learn from the Project365 will help my photography. These images are technically fine. A nice balance of Aperture, ISO & shutter speed rendered what I consider to be vaguely romantic photos. What did I learn this evening ? To stop and shoot the wondrous beauty when & where I see it.


Thursday, December 19, 2013

Project365 - Lit From Below...

I read a lot of blogs & eZines about photography. It provides me with ideas, tips and perspectives. One of the things I read about was looking at - and photographing - flowers from the underside. I have tried it, and it created a beautiful photo ! Still feeling a little "housebound" due to the weather, I was trying to find an indoor subject to shoot tonight. Alas, Diesel (aka Demon Spawn) has happily eaten all the blooms off Pat's orchids ! Sitting in the living room, I was admiring how one of the table lamps lit this ivy from below. I like how warm the light is, and how it plays up the colour of the leaves.

In this image, I was struck by how many shades of green were visible. And then I started seeing the yellow hues, too ! The composition is nothing to write home about, but I love how well my 40mm prime lens picked up the subtle shading.


This is the same plant, but from a different angle. The very large aperture really creates a visible depth of field - you can see that not all the leaves are in focus. My hope was that it would have an entirely different look & feel. It does, and it doesn't. Personally, I'm not sure I like this picture !

Sunday, December 15, 2013

Project 365 - Doing It Manually

As you no doubt recall, I am embarking on a new project. Called a 365 Project, the object of the exercise is to shoot new photographs every day. With most projects, they tend to follow a theme. Mine is a little different, in that I want to use the project for two purposes:

1) to make the basic techniques of photography second nature

2) to allow me to spend more time thinking about composition than technique

With out further ado, here's my first day's offerings:

This is Sandy. She doesn't seem too impressed. It's a simple shot, using my wide-angle lens, using her eyes as the focal point.


This is also Sandy. You can see Annie in the background.


This is Pat's beautiful Christmas Cactus, in full bloom, enjoying a sunny window. The following shots are "macro-style" - the best I can do without an actual macro lense.


Here is a bud, as seen almost in the centre of the photograph above. You can see the extremely narrow depth of field. The only way to get the whole bulb in focus is to use a post-processing method called "focus stacking". I don't like to do much in post, as it seems to be "cheating" to me...


Here's the same bulb, from the other side. I managed to capture a little more detail of the forming petals in the bulb.


Here is a photo of the stamen of the flower. You can't really make it out on the first picture, as it is so tiny. I took this using a 24mm extension tube in front of my 40mm prime lens.


And that's the end of my first day's offering. I hope you continue to check in regularly on my 365 Project. Hopefully, you'll see some improvement !


Friday, November 29, 2013

Photography - Calla Lilies

I love taking pictures of flora & fauna. We live in such a beautiful world ! I pay homage with a few examples:

Calla Lily
Calla Lily #2
Calla Lily #3
Calla Lily #1
Calla Lily #4

As you can see, I was quite moved by the Calla Lilies in California. We had travelled to San Francisco on vacation, and these were some of the natural beauty we saw.


The opinions expressed are purely those of the author. Opinions are like noses - everyone has one, and they are entitled to it !