Friday, May 9, 2014

Project365 - Manipulating Light with Gels

Introduction
I really should stop calling this a 365 Project - we've been so busy moving and settling into the new house that I really haven't been able to make time to shoot. I will do my very best to get back to shooting regularly, if not every day !

Pat taught me how to make jam over the past few days. On the first evening, we made ten jars of strawberry jam. I thought it would make a colourful subject for this blog, so I documented the process. The second evening, we made bumbleberry jam. This time I slowed down & thought about what I was doing. I made two changes between the first & second nights.

The Setup

Day 1 - I shot handheld, with my Canon 60D. I wanted a fast lens, so I used my Canon 40mm f2.8 lens, and mounted my Canon 430 EX II flash in the hotshoe.

Day 2 - still handheld with the 60D, but with my Canon 24-105mm f/4 L lens instead. I mounted the flash in the hotshoe, but added a half-density orange gel to correct for the incandescent lighting.

Let's see how the pictures look !

The Photos

Day 1 - no gel:

Here is Pat, cooking the strawberry jam. It's bubbling away so hard, it looked molten ! Notice the yellowish tinge in the appliances & her shirt ! That's the incandescent lighting.


Here we see the yellow tinge, but more pronounced.


Day 2 - 1/2 CTO Gel on the flash

In this photo, the colours are correct. The whites are white - not cream, and the strawberry jam is a brilliant red.


Did I mention we made a dozen jars ? ;-)


Lessons Learned

Once again, I need to remember to slow down & plan my shoots. The photos turn out much better when I think through all the components - especially when I think about light temperature !


Wednesday, April 23, 2014

Project365 - Wildlife Photography

Introduction
Wildlife photography can be an especially challenging, and therefore rewarding genre within photography. Depending on your subject, you could traipse all over the world in search of an elusive "prey". Then, a skilled photographer needs to understand his subject's behaviours - where do they live? What do they eat? When are they most active ? Understanding the animal's behaviour is key to capturing compelling photographs.

We have been busy with moving (hence so few posts lately - sorry !) and the new house has a beautiful backyard, with trees & shrubs. Further, it is secluded away from any high-traffic streets, making it calm & peaceful - a perfect venue for photographing birds !

I will readily admit - I cheated ! I hung a couple of bird-feeders to attract the local "cheep cheeps". It gave me the ability to get them relatively stationary, as well as attracting a variety of different kinds of birdies.

The Setup

I set my Canon 60D on top of my Manfrotto tripod. The feeder is at the back of the yard, so I wanted all the stability I could get - I even used the shutter-release cable ! Then, in order to get nice & tight, I mounted my Canon 70-200mm f/4 L series lens, but I fronted it with a Canon 1.4X TeleConverter. Some fast math makes it: 200mm X 1.4 (the TC) X 1.6 (the crop factor for the APS-C sensor). That comes out with an effective lens length of 448mm of telephoto goodness.

At that length, camera shake is a real concern. I had already physically stabilized the camera with the tripod, but just to be safe, I made sure to shoot at no less than 1/400 of a second. I didn't want to create any bokeh effects, or worry about Depth of Field issues, so I set up at f/11. In order to achieve decent exposures, I ran the ISO up to 2000 !

Finally, because it is getting chilly out, I elected to stay indoors. Shooting through a window means you have to be careful with reflections & dirty windows, but we made out OK. See for your self !

The Photos

I took about 30 exposures, and kept about half. Of those, there were really only half a dozen which caught my eye. Here they are, for your enjoyment:

I apologize, but I know almost nothing about birds. This fancy little red fellow caught my eye right away !


This handsome pair stayed for most of the 30 minute shoot. Perhaps they knew they were being photographed ?


The little red fellow took turns keeping watch as the other birds ate.


W.C. fields made a name for himself & referred to all women as "my little chickadee !" .


See what I mean ? That little fellow kept a silent vigil for the other birds...


Finally, he came and are himself, after all the other little birdies ate !


Lessons Learned

This was a straight-forward shoot. I would have liked to capture the birdies as they landed, perhaps if I drove up the shutter speed, I might capture some fantastic wing-action ! Next time... The feeders aren't going anywhere... ;-)


Sunday, April 13, 2014

Project365 - Of Grids and Snoots

Introduction
I managed to collect the components of my Honl speed strap & gels system yesterday. They also make a grid, so I picked one of this up up as well. Grids & Snoots are another form of light modifier for your flash system. They don't change the colour temperature of your flash, instead they focus the beam.

Why would you want to do that ? It allows the photographer to more selectively light the scene. Imagine a photo of a model in a dark room. Perhaps you want to expose the background to look like a black backdrop. That's easily achieved, but you still need to light up the model, to show off contrast and colour. The grid or snoot will help "aim" the light at the models face, while minimizing the spillover onto the background.


The Setup

These are some more "goofing around" shots. None of my available models were out of bed yet, and I was getting impatient. A very simple setup, with the Honl 1/8 grid attached to the Canon 430 EX II via the Honl speed strap. The whole shebang is mounted on the hotshoe of my Canon 60D, which has my general purpose 24-105mm f/4 L lens attached. I shot handheld for quick & dirty testing.


The Photos

A simple before and after shot. First without the grid, followed by a photo taken with the grid.

Note the even lighting. I used no other light modifier, like a gel, as there was no other ambient light - just the flash at 1/8 power.


For comparison, this photo is shot with the exact same settings, and the grid in place. Note how quickly the light falls off ! The grid directs the flash down a very narrow beam.


Lessons Learned

The use of a grid or snoot allows more creative use of light. It provides an easy way of selectively lighting a small portion of the frame, while quickly allowing the ambient light to light the rest. I see this as very useful for fill-flash and portraiture.


Project365 - Flash Light-Modifiers

Introduction
I have been noticing that I am often unhappy with the colours of my photographs when I shoot with a flash. While there is a white-balance setting on my camera, the light from the flash is a harsh white, which competes with other lighting in the photograph. There are a ton of ways to light scenes - you might be outside on a shady or sunny day. You might be interested in taking family portraits in the living room. Or perhaps you are doing commercial work, shooting products or Executives.

Seems that different lighting has different "temperatures" - you get a feel for it when you see pictures that appear to have a cool blue tinge, or ones that have a warm orange glow to them. Colour temperature is measured in terms of degrees Kelvin, and different lighting has different colours associated with them. Primarily, the objective is to get back to an "honest" white colour. Unless, of course, you WANT to create warmer or cooler tones in your photographs !


The Setup

It took me a bit of running around town, but I finally picked up the components I wanted. My preferred supplier, Saneal Cameras in Calgary, had the Honl speed strap at one store, and the gels at another. I bought a grid while I was at it, but we'll discuss that in a separate blog entry. I like the Honl system, because it makes quickly changing between gels and grids easy. The speed strap loops around the flash and then the components attach to the Velcro for a firm grip.

This isn't really a photo shoot, I was just messing around, attaching the gels & seeing what the effects are. I used my handy Canon 60D handheld, and affixed the 24-105mm f/4 L series lens. Around one of my Canon 430 EX II speed lights, I wrapped the Honl speed strap and started expeimenting. I have:

2X full Green gels (CTG ?)

1X full Blue gel (CTB)

1X half Blue gel (CTB)

2X full Orange gel (CTO)

2X half Orange gel (CTO)

2X quarter Orange gel (CTO)


The Photos

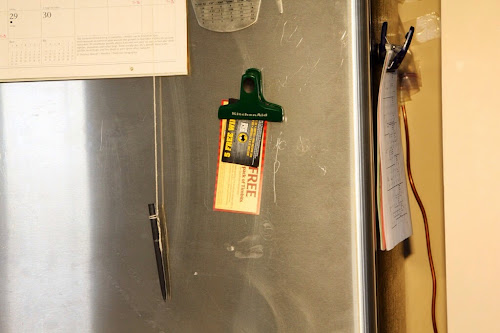
This photo was taken with a full green gel. If you compare to the other two pictures, everything has a sickly green colour. The kitchen was illuminated only by the light coming in the window. The green gels are to be used to colour-correct for fluorescent lighting.


This photo has the full blue gel applied to the flash. Can you see the difference ? I bet you can ! Note that the calendar (taking the top left corner) is white.


This photo was taken with the full orange gel applied to the flash. It's amazing the difference that the different gels make. Note that the wall beside/behind the refrigerator is a light beige colour.


So let's see the colour-correction in action. For the following two photos, I took shots of the window & door off of our dining area. The window and door are brilliant white, while the only light source is the tungsten (incandescent) chandelier overhead.

This photo was shot using the flash, but without any gel to modify the light source. See how there is an dingy yellow cast to it ?


Here is the same scene, only using the full orange gel. The whites look white again !


Lessons Learned

Photography is merely the task of capturing light. But when we need to add external light to a scene, such as a full-flash, we need to be careful to balance our flash against the ambient light in the scene. I will keep experimenting with flash photography, and use the gels accordingly. The aim is to improve the overall appearance of the photos.


Sunday, April 6, 2014

Project365 - Two Strobe Portraits

Introduction
In my last installment, I refined my technique for creating a deep black background. In this shoot, I applied that technique, along with two flashes to create more interesting portraits.


The Setup

My thought was to set up for a black background, and then light the model from above and to her right. Then, I wanted to place another strobe below and behind her. I was hoping to create a sort of light halo effect. Unfortunately, I didn't get the halo as her hair was as dark as the background. Worse, I had remarkably dark shadows across her face.

I shot the Canon 60D handheld. In the hotshoe was one of the Cactus v5s. I was set for a black background - f/250, ISO 100 and an aperture of 16. One Canon 430EX II was mounted on a Cactus v5 atop a tripod to the kodel's right, while the other was mounted on the trigger and placed on the floor.

The Photos

I am still learning about portraiture. It's not really something I'm very good at, so I was fortunate that my daughter agreed to be my model. It is easy to have a good rapport...

In this first photo, the main light was too powerful. While I had a nice dark background, you couldn't really see any definition between the background and the kodel's hair. And the pose is funny - unnatural, even. It looks like her eyes are pointed in two different directions !


Here, the main light is better, but the secondary is still underpowered. There are very harsh shadows on the models face. Given how pale her skin is, I would've liked to have made her skin tones warmer with a bit of makeup.


This one is better. We see a nice cross-lit effect, haloing her cheek and chin. And there is even a hint of catch-lights in her eyes ! But her dark hair is lost in the black background, still.


This is a little bit tighter a shot. I like the effect of the cross-lighting, and the black background.


Lessons Learned

I still need to figure out how to create the halo effect around the model's hair. I suspect my life would be easier shooting at night, when the room is darker to begin with. I'd also like to try to use a reflector to cross-light the face, which would free up the flash for the halo effect !


Saturday, April 5, 2014

Project365 - Black Backdrop

Introduction
Today I learned much more about a technique I had attempted once before. Now that I better understood how it worked, I believe I am better able to put it to good use. You see, one of the things that most studio photographers invest in is backdrops. Often large rolls of seamless white or black paper, they allow the subject to be the true focus of the photograph. Who knew I was carrying a black backdrop around in my camera ?!?

It's truly a simple effect involving the use of flash (or sometimes called strobe) photography. Cameras have a maximum speed with which they can sync with the flash to achieve a nicely lit picture, it's usually around 1/250th of a second. Keeping that portion of the exposure triangle still, we next dial down the ISO (the sensitivity of the CCD) to 100. The only thing left that is adjustable is the aperture. All we do is close that down until a picture taken in the ambient light is completely black. Now, anything lit up by the flash will be nicely lit, while the background remains black.

The Setup

Nothing really complicated the Canon 60D, set at f/16, ISO 100, and a shutter speed of 1/250th of a second. The Cactus v5 was mounted in the hotshoe, so I could use the Canon 430EX II off-camera. I placed it on a basic tripod with the other Cactus v5, so I could move the light & the camera around freely.

The Photos

Believe it or not, this is a photo of Pat's flowers on the dining room table. I was setting the ISO, Aperture and shutter speed to get a black background. Got it !


Whoops ! The flash was spilling onto the background too much, so I elected to put a snoot on the flash, to more tightly focus the beam.


That's better ! Although you will notice the pen & paper on the tabletop still show up faintly. Now to play around a bit... ;-)


The first few pictures weren't as bright as I would have liked, so they came out a little dull. Time to up the power of the flash a notch, and move the light stand a little closer !


Much better ! I like the contrast created by the various petals on the flowers.


I think this is one of my favorite photographs of the shoot...


Lessons Learned

I thought I really understood this technique, but now with a little better tutorial, I think I know how to nail it whenever I need it. Certainly, implementing the snoot helped narrow the beam, and moving the light stand over to one side helped with not lighting the background. I really like this technique & see myself using it for portrait work.


Project365 - In the Kitchen

Introduction
Pat bought me a slab of Montréal Smoked Meat from Dunn's. It's an extra-special treat, bringing back memories of kosher dill pickles, beautiful rye bread, and tangy mustard. These were all shared with my father, whose laboratory at McGill was just a few short blocks from Dunn's famous delicatessen.

So todays's project was to slice it up & repackage it, so that we could enjoy it over a longer time. Unfortunately, we are also getting ready to move, so our meat-slicer is packed, but I know not where !


The Setup

Product shoots require a little bit of planning. Usually, you use a light-box, which helps create evenly diffused light on all surfaces of the product. I didn't want to lose the feeling that we were in the kitchen, so I decided to just shoot handheld, right on the cutting board

I used my trusty Canon 60D, and mounted my 40mm "pancake" lens. While it is capable of a nice wide aperture, I wasn't interested in a really shallow depth of field, so I shot it at about f/8. I also mounted a single Canon 430EX II on a Cactus v5 trigger, so that I could simply wash the ceiling & create a more natural light.


The Photos

So let's see how we did:

The smoked meat had a beautiful "marbled" effect. Montréalers will tell you, it must be served fatty & hot, so the fat runs out, releasing the flavour !


When the meat is cured, it is first rubbed with a wonderful medley of cracked pepper, which you can see here. Obviously, this shot is taken before we began slicing the meat.


While I wasn't able to shave it as close as I could have with the slicer, I still got nice thin slices. We then arranged them in stacks, so that they could be repackaged.


Lessons Learned

I spent a lot of time working out the lighting. I took a number of shots that I immediately discarded, as they looked so unnatural. I tried bouncing the light, dialling it down & aiming it slightly away, and I still couldn't get the look I was looking for. Finally, I decided "back to basics !" and washed the ceiling with light at about half power. Finally, it looked natural to me.


Sunday, March 30, 2014

Project365 - Second Curtain Flash

Introduction
The kids are over for the weekend, but the continual snow has everybody a little down. So what better to lift everybody's mood than a little RC Car racing ? Since the cars move on a set track, it's pretty straightforward to capture some of the action. It's also a great opportunity to try a new technique called Second Curtain Flash.

The idea is that under normal conditions the flash fires as the shutter opens, freezing the action. Then, depending on the shutter speed, the shutter closes again, finishing the shot. Second Curtain Shutter delays the flash until the shutter is about to close. So in slightly longer exposure shots, the effect is to capture some blur of movement, and then freeze the action with the flash.

The Setup

My trusty Canon 60D, with the venerable 24-105mm f/4 L lens. The Canon 430EX II flash is mounted on the hotshoe, and set to ETTL and Second Curtain Flash. In order to get the blur, the shutter was set to 1/4 second, aperture at f8, and the ISO at 125. I shot handheld, as I was down on the floor, on my belly to achieve the look I wanted.

The Photos

A little racing action sees the grey car passing the yellow car. The blue streaks are actually the Bluetooth indicator lights on top of the cars.


I really like how the yellow car blurs brightly. You get such a sense of speed from this effect !


Taken a little bit wider, both cars are in the frame. Unfortunately, there's not much contrast between the grey car's "blur" and the dark background. So it's not as good as I had hoped.


Lessons Learned

This was a quick little shoot - only a dozen or so photos. I like the effect, but have come to realize that it works best when you have high contrast between the background and the subject.


Wednesday, March 26, 2014

Project365 - Let's Go For a Drive !

Introduction
I have been thinking about this shoot for a while. I wanted to play with motion, but instead of having the subject crisp & everything else blurry - ala Bokeh - I wanted to capture the feeling of being in motion. After shooting the Auto Strobism shoot, I liked the setup in the car. And this gave me the idea for the shoot !


The Setup

This was a lot more of a complex setup than I expected. The idea was to mount the camera (Canon 60D), on the Manfrotto tripod in the back seat of the truck. In order to capture the entire windshield, as well as the occupants of the front seat, I switched to the Canon17-40mm f/4 wide-angle lens, and kept it at 17mm. I was worried about the stability of it all, so I looped the neck strap of the camera over the centre headrest. Finally, in order to get some light in the cabin, we set up the Canon 430EX II flash with my inflatable diffuser.

This photo (taken with my iPhone) shows the camera on the tripod, and the flash mounted in the hotshoe. As you can see, the iPhone camera really sucks in low-light conditions ! With the camera in the back seat, the setup was laborious - pull over, hop in the backseat, make adjustments, test shoot, refocus & start all over again !


In this side shot, you can see the shutter release cable dangling down from the camera body. Unfortunately, the cable is very short, so Pat had to hold her hand back behind her (out of the shot) to take the photos. She was an absolute trooper for staying in that position through 90 minutes and 270 shots !


The Photos

Here we are in the driveway. I knew I'd need to have some light inside the cabin, but we spent a few minutes figuring out the placement. At first, I thought off-camera would look good. I really didn't like how this looked at all - very unnatural !


Here is the first good shot - the cabin of the truck & passengers are reasonably lit, and in-focus. The outside is visible and somewhat blurry. The exposures were taken at 1 second, to enhance the feeling of motion.


This is actually one of my favorites. Most of the outside is blurry - look at the streaky headlights of the oncoming traffic ! But I was keeping pace with the car on our right, so it stayed reasonably in focus. This is the style I was after !


Man down ! Apparently, the rig wasn't as stable as I had hoped. I'm fortunate nothing got damaged as the tripod toppled over...


Occasionally, if we paused for too long, the flash would go into battery-saving mode, and not fire on the first shot. So we have about a dozen shots with no interior lighting.


This photo illustrates one of our challenges - how bumpy Calgary's roads are. The streak on the left is an oncoming car. The headlights waver up & down as the truck contends with the uneven road surface. That internal shake ruined quite a few shots entirely.


This photo was taken as we drove over the flyover into the downtown core. The exterior is blurred, giving the feeling of motion, while still focused enough to see where we are.


This is one of my favorite photos captured of the night's shoot. The passing traffic really conveys the feeling of movement. The viewer really feels like they are in the truck with us, driving through the city.


Lessons Learned

This was a complex shoot. I have to give a LOT of credit to my assistant, Pat. She not only fired off the 270 frames, but also had my iPad in her lap (out of sight of the camera) to validate we were getting the shots we wanted. The rigging of the camera in the backseat was OK - we really only toppled over twice in over 90 minutes of shooting. The shutter release cable is WAY too short - I think I am going to investigate a wireless option.

Over all, I am happy with the results. We captured about a dozen really cool photographs, which beautifully convey the feeling of motion. Let me know of you agree ! =D